My current work / past work can now be found here:
James' Portfolio
My CV, email address, etc can also be found there.
Cheers
Thursday 2 July 2009
Tuesday 15 April 2008
Final Assignment Update
By now, we have fully complete our animation, and rendered it in high quality. I have also been able to get use of a scanner, and have also scanned in the storyboard, which I will post up here too.
Here is our video, but it isn't the polished one, due to the restriction of the size of a video you can upload:
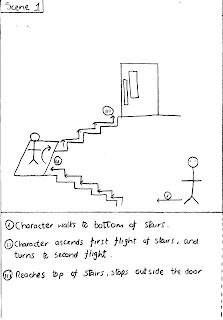
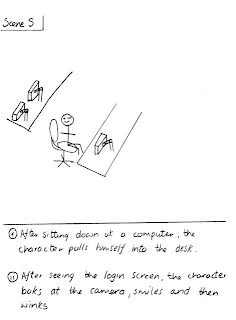
Here is the storyboard we created in the first week, I have split it into five pictures, each picture is a scene from the storyboard:
Scene 1:
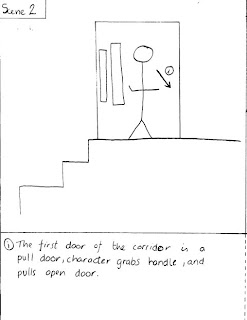
Scene 2:
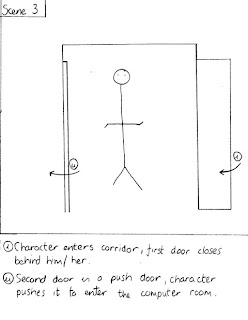
Scene 3:
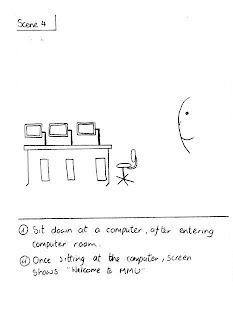
Scene 4:
Scene 5:
Here is our video, but it isn't the polished one, due to the restriction of the size of a video you can upload:
Here is the storyboard we created in the first week, I have split it into five pictures, each picture is a scene from the storyboard:
Scene 1:

Scene 2:

Scene 3:

Scene 4:

Scene 5:

Today we will present the animation, along with a powerpoint slide, detailing what we have done.
Saturday 12 April 2008
Assignment Update 5
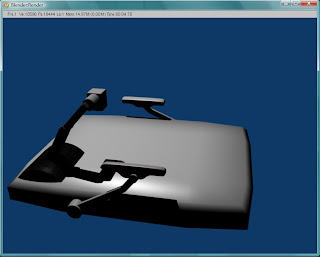
The weeks we were away for Easter, we made a large amount of progress, we now have a character with a full walk cycle, in between stages, and the ability to open and close doors. The one cycle we still need to complete is the stair climbing cycle. Below we have included a video of what the computer room looks like. As you can see, the objects from before Easter now have colour, there are extra objects, and the toon shading works quite well with it all. Following our storyboard created in the first few weeks, we are now on the closing scene from that.
Wednesday 20 February 2008
Week 18
This week we looked at exsisting character rigs so we can understand how they walk, jump and run. I loaded several rigs which showed these various animations.
Questions
1. "How will you make the character run faster or slower?"
To achieve this we can simply scale all of the keys either away or towards the vertical line to speed up or slow down the animation.
2. "How will you make the character walk/run forward?"
To make the charcter actually move instead of walking on the spot there are two possible ways. In blender we can make the arms follow a cruve path and then using a special bone called a stride bone we can keep the feet spaced properly, the other way we can achieve this is to manually move the bones of the character to achieve our walking animation.
Assignment Update 3
With this update, we show how we have completed a walk cycle for Ludwig, although it still requires some fine tuning, it is mostly completed, and usable in our animation, a video of the walk cycle is included below. We also made some backgroung environment objects, such as a projector, chair, etc, also shown below.
Ludwig Walk Cycle:
The projector:
Finally, a model of one of the chairs we use in class:

Questions
1. "How will you make the character run faster or slower?"
To achieve this we can simply scale all of the keys either away or towards the vertical line to speed up or slow down the animation.
2. "How will you make the character walk/run forward?"
To make the charcter actually move instead of walking on the spot there are two possible ways. In blender we can make the arms follow a cruve path and then using a special bone called a stride bone we can keep the feet spaced properly, the other way we can achieve this is to manually move the bones of the character to achieve our walking animation.
Assignment Update 3
With this update, we show how we have completed a walk cycle for Ludwig, although it still requires some fine tuning, it is mostly completed, and usable in our animation, a video of the walk cycle is included below. We also made some backgroung environment objects, such as a projector, chair, etc, also shown below.
Ludwig Walk Cycle:
The projector:

Finally, a model of one of the chairs we use in class:

Tuesday 5 February 2008
Week 17
This week we are dealing with Object animation, and more specifically the timeline and the Ipo editor, in order to create a bouncing ball animation on screen, which squashes and stretches as it bounces.
Firstly, we needed to undersand the different parts of the timeline.
There isn't many things to be explained about the timeline, mainly just the play button, which starts the animation, and the fast forward/rewind buttons, whcih again are self-explanatory. Frames can be placed in the timeline at any stage, and Alt+A is used to start the animation. Finally the left and right arrow keys are used to move, frame-by-frame through an animation.
Next step to create an animation, was to have objects to animate. We loaded a basic ball and a plane for the ball to bounce from. We then moved the ball to it's first frame, and created a 'key', lowered it to the ground and then created a second key at frame 20. Finally we selected the 1st key and using shift+d we copied it and doubled it, so we now had an animation that was 40 frame long. The below curve is the path of the ball on the z-axis:
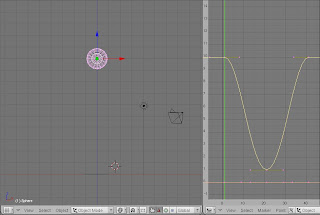
The problem with this curve is that it didn't give a realistic bounce, so the next step was to change this curve. We did this by entering edit mode on the curve, pressing 'v' tochange the curve to vector, then grabbing the curves handles, and repositioning them. Which resulted in the following:

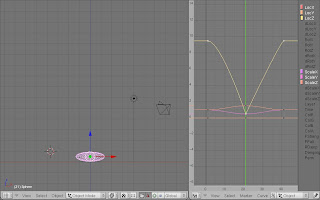
This curve is a lot sharper, and reflects a ball's bounce a lot better. The final step was adding a 'cartoony' bounce to the ball, where it squashed and stretched as it collided with the ground.
This required us to add more keys, more specifically scale keys, so as not to affect the location keys we already had. Once added, we positioned the ball near the ground, squashed it, and added a key position, as you can see below - note the new lines in the animation window:
The final stage involved stretching the ball before it hit the ground and as it recoiled from the ground. We could do this by creating 2 different stretches, however this would take longer, and lead to inconsistencies in the stretch, so we created one stretch, and using shift+d copied it over to the frame right after the ball bounces off the ground.
Here is the final animation, it's basic, but illustrates all that is mentioned:
Next step to create an animation, was to have objects to animate. We loaded a basic ball and a plane for the ball to bounce from. We then moved the ball to it's first frame, and created a 'key', lowered it to the ground and then created a second key at frame 20. Finally we selected the 1st key and using shift+d we copied it and doubled it, so we now had an animation that was 40 frame long. The below curve is the path of the ball on the z-axis:

The problem with this curve is that it didn't give a realistic bounce, so the next step was to change this curve. We did this by entering edit mode on the curve, pressing 'v' tochange the curve to vector, then grabbing the curves handles, and repositioning them. Which resulted in the following:

This curve is a lot sharper, and reflects a ball's bounce a lot better. The final step was adding a 'cartoony' bounce to the ball, where it squashed and stretched as it collided with the ground.
This required us to add more keys, more specifically scale keys, so as not to affect the location keys we already had. Once added, we positioned the ball near the ground, squashed it, and added a key position, as you can see below - note the new lines in the animation window:

The final stage involved stretching the ball before it hit the ground and as it recoiled from the ground. We could do this by creating 2 different stretches, however this would take longer, and lead to inconsistencies in the stretch, so we created one stretch, and using shift+d copied it over to the frame right after the ball bounces off the ground.
Here is the final animation, it's basic, but illustrates all that is mentioned:
Cyclic Extend
This takes the same section of Ipo and repeats it over and voer. In the case of the video above, using cyclic extend would allow the ball bounce to be copied again and again.
Cyclic Extrapolation
Similar to cyclic extend, it does use repetition, however it starts the new repetition, where the last one left off.
Assignment Update 2
At this stage we started laying out the basic scene in Blender (some screenshots are included below). We also decided to use the fully rigged character, called Ludwig, downloaded from here. Since we are beginners in Blender, making a fully rigged character (with bones and facial expression) proved very difficult - and along with our time constraint, we thought it was best we use a pre made character, and focues on animating. You may also notice, the screenshots have a cartoony look to them. This technique is called 'toon shading', and we used it to give our animation a unique feel, which looks good too.
Screenshots:-
The building we are making, this is the empty (for now!) computer room:

And Ludwig, our character for the animation:

Tuesday 29 January 2008
Week 16
1a. There are many different types of bones that can be used in an armature system, and they are shown below:
- Deform Bones: These types of bones are allowed to affect the mesh of an object, and are the default type of bones used in Blender
- B-Bones: This stands for Bezier bones, which means these types of bones can be bent and twisted, as they can be broken into multiple segments. An example for using this type of bones would be for a spine, or a ball-and-socket joint.
- IK Solvers: Based on Inverse Kinetics, and works on the basis of depending on where the tip of the bone 'chain' is, it will reposition the other bones connected to that chain.
- Stride Bone: In relation to a human skeleton, these types of bones are used to ensure that a foot would be placed relative to the stairs it is walking up, for example.
- Ipo Drivers: stands for InterPOlation driver. By associating a bone's position with an Ipo driver, the bones can now control any animatable property of the object.
1b. An armature constraint is one which would restrict the movement of a bone, to appear realistic (an example in a human skeleton would be not allowing the knee joint to bend forward, so the toes could touch the thigh).
There are many different types of constraints:
- IK Constraint, Copy Location/Rotation/Scale, Track-to Constraint, Floor Constraint, Stretch-to Constraint, Action Constraint.
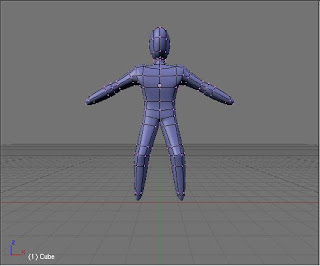
Building an armature
We started with the below model as our base model:
Next step to now get a posable model was to begin adding the bones, this was done by adding an 'armature' to the model (using the spacebar menu), as shown below:
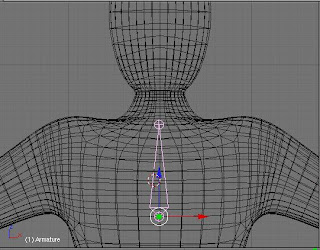
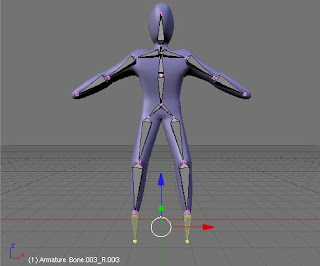
Here you can see a bone is placed in the middle of the chest. Continuing, we then added other bones, relevant to where on a human body they would be. Obviously we did not add as many bones as there are, but the major groups, especially where joints are, once this was done, this is what we ended up with:
To make these bones affect the mesh they were contined within, we now had to add a modifier, the armature modifier to be precise. This produces tube like structures, with a white shadow around them. These white shadow are the areas affected by that particular bone, and can be enlarged or reduced, by selecting the bone and the holding Alt+S. This is what we did, shown below:
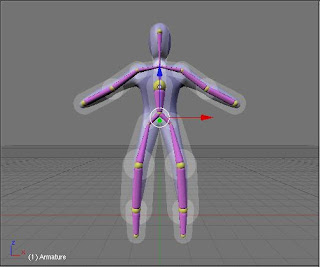
The final stage was to increase the size of these envelopes, and the 'white shadows' around them so as they enclose the whole body mesh, or else they wont fully affect the body, creating unrealistic looks when posing the body. Once that is complete, we enter Pose Mode, which allows us to create a pose for the model. The first picture shows the whole body mesh enclosed, and the second picture shows the bones as sticks (this makes it easier to pose, as it looks less cluttered than the envelopes.
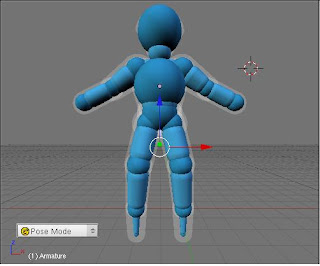
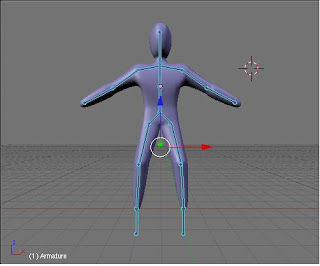
This final picture is now posable.
Assignment Update
Storyboard concept has been created, along with basic sketches of what we would like our character to look like. Rough sketches of the storyboard have been made on paper, and final sketches will be made soon.
Building an armature
We started with the below model as our base model:

Next step to now get a posable model was to begin adding the bones, this was done by adding an 'armature' to the model (using the spacebar menu), as shown below:

Here you can see a bone is placed in the middle of the chest. Continuing, we then added other bones, relevant to where on a human body they would be. Obviously we did not add as many bones as there are, but the major groups, especially where joints are, once this was done, this is what we ended up with:

To make these bones affect the mesh they were contined within, we now had to add a modifier, the armature modifier to be precise. This produces tube like structures, with a white shadow around them. These white shadow are the areas affected by that particular bone, and can be enlarged or reduced, by selecting the bone and the holding Alt+S. This is what we did, shown below:

The final stage was to increase the size of these envelopes, and the 'white shadows' around them so as they enclose the whole body mesh, or else they wont fully affect the body, creating unrealistic looks when posing the body. Once that is complete, we enter Pose Mode, which allows us to create a pose for the model. The first picture shows the whole body mesh enclosed, and the second picture shows the bones as sticks (this makes it easier to pose, as it looks less cluttered than the envelopes.


This final picture is now posable.
Assignment Update
Storyboard concept has been created, along with basic sketches of what we would like our character to look like. Rough sketches of the storyboard have been made on paper, and final sketches will be made soon.
Week 15
In this week we explored adding colours and textures to our models.
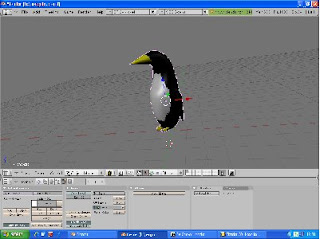
Adding Surface Colours

Adding Surface Colours
The second image shows a UV Map applied to a set of cubes.
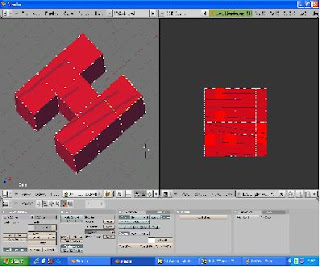
UV Map Texture

UV Map Texture
Questions
3a. What is "Toon Shading"? How does it afect the appearance of characters
Answer: Toon Shading is the process of adding colours and bold outlines to the edges of your model to make it appear more cartoon like.
3b. What is UV Mapping? How does UV Mapping help in shading 3D Characters?
Answer: UV Mapping allows you to break down a 3D Mesh and represent it as a 2D image. UV Mapping makes it easier for the artists to add shading to the model if they have a 2D representation of it
Subscribe to:
Posts (Atom)